
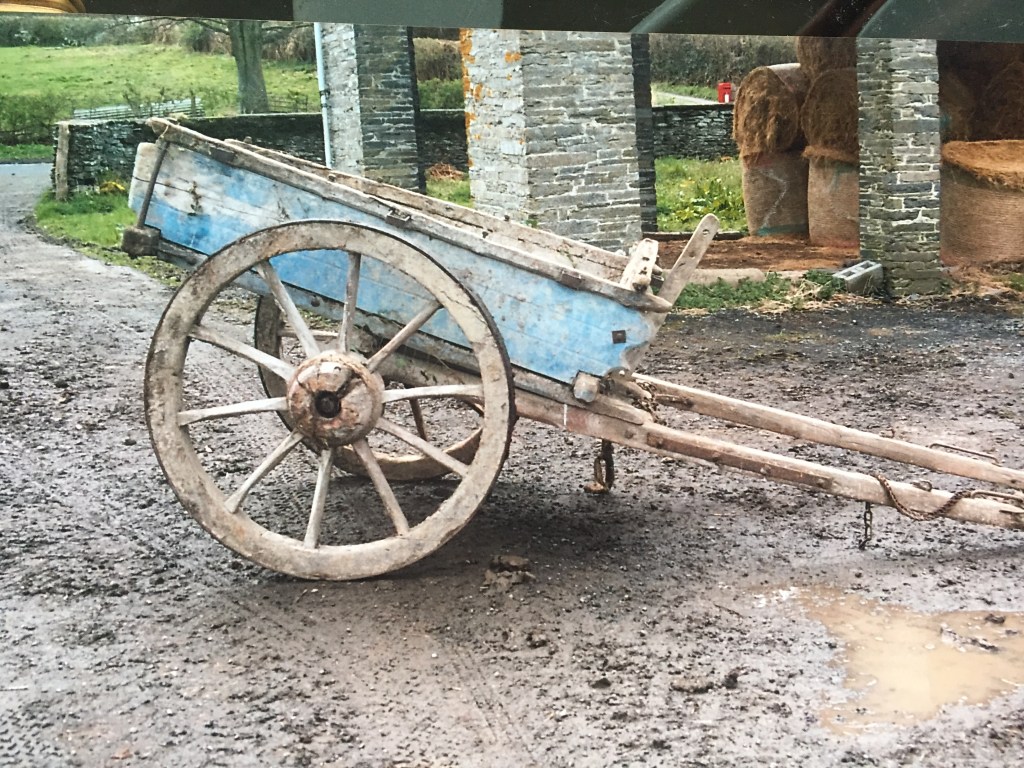
The late nineteenth century tumbril (I tend to use the term Tumbril but this type was also known as ‘tip’ cart, Scotch cart, ‘tub’ cart and ‘muck’ cart) came to me from the last of the Jones’ of Aberduhonnu , near Builth Wells in Breconshire. It was however first used at Ysciog farm at Abernant near Erwood where the Jones’ farmed in the early decades of the twentieth century. Historically this style of two wheel cart is believed to have been first developed in Scotland but it has such a resemblance to the European version that it seems more likely to have been brought into Britain, possibly by the Normans or even earlier, and maybe was fine-tuned into the cart most commonly seen throughout Britain by the mid 1800s. My particular cart has a date stamp of 1892. The stamp is found on the steel stub axle and therefore can only give a ‘not earlier than’ date but even this is debatable for the cart could well have been converted (from a wooden axle tree) or repaired having been originally constructed decades earlier. Similarly the dated stub axle may have lain in store for several years or have been retrieved from an old cart and fitted onto a much newer one. Thus ‘a late nineteenth century’ cart is my description.
Whilst several of my horse drawn vehicles have required repairs to varying degrees it is this particular cart that has received the most attention thus far and that has allowed me to gain a greater understanding of the design and build processes. I have therefore decided to give a fuller description of what I did so as to inform others of what was involved. However, I need to point out from the outset that my carpentry skills are in no way either competent nor professional – how I would love to have been a trained woodworking expert who could cut a precision mortice and tenon joint ! – and so others may well undertake such a restoration with far better results and more respectful of the heritage at hand. With what I knew and the limited budget I had – yes, sending the wheels to my friend, a professional wheelwright, to have a couple of new felloes fitted, a spoke or two replaced, maybe even a new hub, would have been great, I knew the cost of that. I have a wheelcar in the shed with two new wheels fantastically made by him but the cost was in four figures and beyond my pensioner’s budget nowadays ! – I did the best I could to put the old tumbril back to a stable condition enabling it to move about and demonstrate what it would have looked like in its ‘hay’ day. So, dear readers, accept my apologies if my work offends, I have a smile of achievement on my face !
The starting point with any cart, indeed the decision whether to acquire it in the first place, is the condition of the wheels. Most old abandoned carts will have rot in the wheels. Depending on where they have been stored, the damage will vary from a rotten felloe, stood for years in inches of mud and manure, to a total collapse. The outdoor storing is almost certain to mean the wheels are totally beyond saving, an indoor enclosed stone barn will usually result in rotting around the edge of the felloes, between the outer wooden rim and the metal tyre where condensation gathers from the cold iron or steel and a loosening of the spokes in the hub and sometimes the hub fracturing somewhat like a chocolate orange ! The best storage is the open sided or open ended Dutch barn where air can blow through. Woodworm will certainly attack in any storage area but the airy open barn seems to be the best in my experience.
The wheels on my tumbril were sound enough, they had been stored in such an open ended shed. Indeed this old tip cart had a bedfellow in that shed, my gambo was interlocked with it and both were well concealed by a large pile of farm detritus. It took me several days to excavate both carts from their place of a half century slumber. Wheeling the tumbril outside for the first time I could see straight away that the wheels were sound enough. Where one would expect to see a ‘wobbly’ creaky roll in a cart so long out of use, this one ran straight and true.
The old cart stood in my open sided shed for a decade before it was moved to my new ‘museum’ (a ‘posh’ word for the farm buildings I now have use of!) and whilst loading it again it appeared to have remained in good stead. Alas, a forty mile ride in my trailer revealed some weaknesses. On arrival one shaft had snapped off at a place where a much earlier repair had been undertaken (the addition of metal plates to support a fracture) and the front cross member had pretty much separated where the mortice for the centre chassis rail had been cut. At the time of the move I took the body/tub off the chassis and wheeled that into an open cart shed whilst the body was propped-up in the main barn.
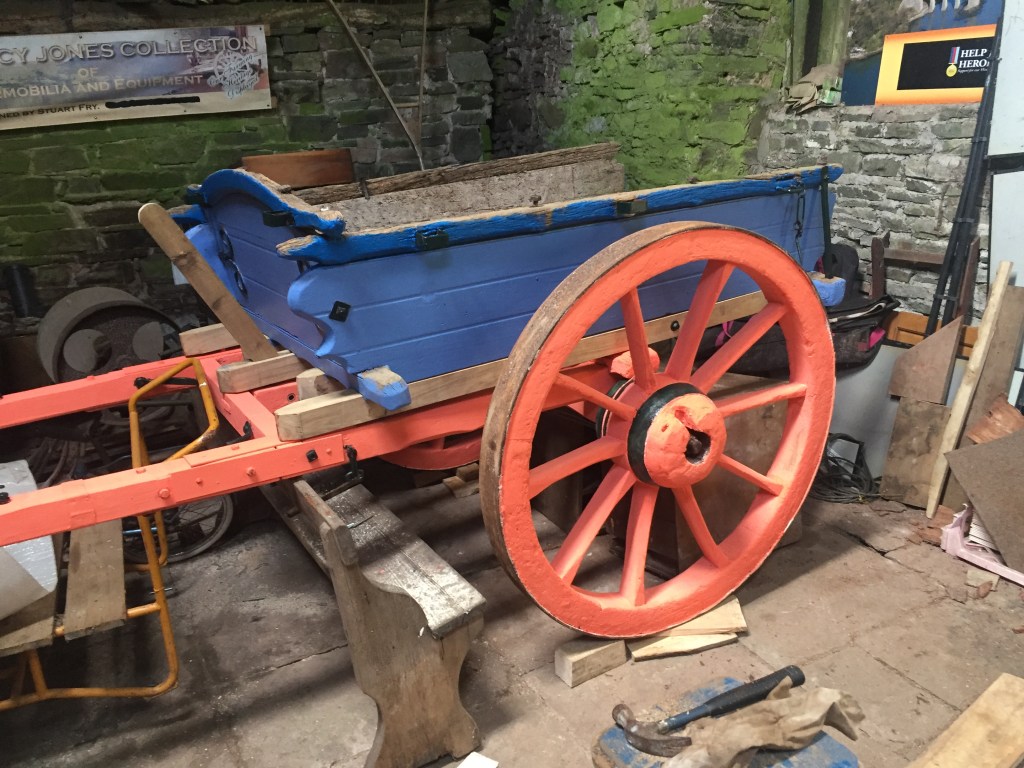
Now, five years later, both have been reunited after many hours of care and repair. The chassis was wheeled into the large barn for the restoration and the whole was securely propped to allow the wheels to be removed. When that last happened no-one can now tell me but it would have certainly been prior to the Second World War. I was told by Jeff (Jones) the last of the farming family, that during the war years the cart had done sterling service on the various tasks required of it to meet the demands of the War Ag. (Breconshire War Agricultural Executive Committee). Both wheels slid off the stub axles with the minimum of effort after I knocked out the key-way and removed the collar dogs, which are like large washers that hold the wheel onto the shaft and they in turn are held in place by metal key-ways which fit into slots in the dog and the axle stub-end.
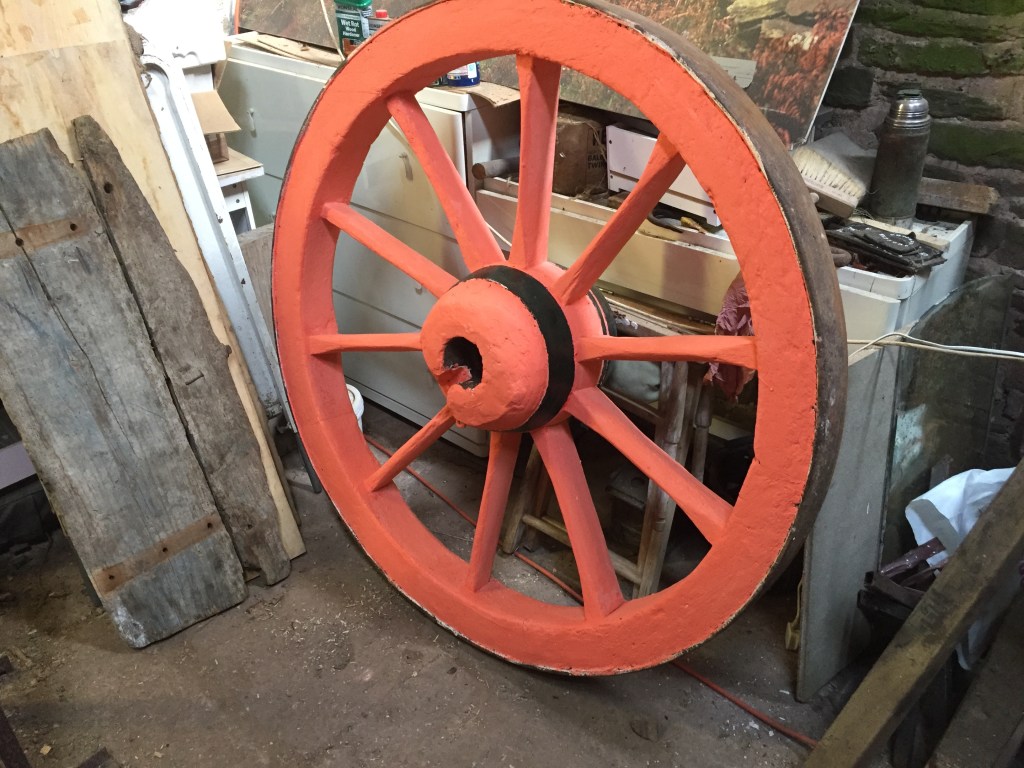
I wheeled the large 4 foot diameter wheels over into the Dutch barn and one-at-the-time gave them a good soak in wood preservative to kill off any little critters that might be enjoying the taste of the old timber. When I first got the cart home from Aberduhonnu back in 2005 I pressure-washed all the old mud and manure off it so I knew that the wheels were free of any stuck-on additions. I use a 5 Star all purpose treatment which whilst expensive, does the trick.
Once the wheel had dried I then took a good look at the areas where rotten wood seemed to be, mainly on the outer edges of the ash felloes and where the oak spokes entered the elm hubs. The hubs themselves, whilst still sound and tight (i.e. the spokes were still well gripped by the hub), had suffered from both insect and animal gnawing at the outer parts of the hub. There was one bad area, about 6 inches (15 cms) in length on one of the felloes which needed total replacement and several more areas where small sections had either already dropped out or needed cutting away. Once that was done it was then time for the next horrid chemical treatment, wood-hardener. Now the real way to use this wonder product is to inject it – more like ‘dribble’ it – into each woodworm hole and allow it to permeate into the vast network of bored tunnels that the pesky little munchers create, that ensures any soft and weak areas deep in the timber is hardened off. There were far too many for me to use that method and so I just painted the hardener over any of the areas which showed signs of needing some attention. Again a day or so of hardening-off is needed before the next stage. I then used glue and new seasoned ash to replace the section of felloe and cut some smaller sections of ash to insert into the larger of the other absent sections. Once I had replaced as much as I could it was then down to wood filler. I’m not sure that filler would be any use as a means of repairing a working cart, indeed I shall be interested to see how well it stays in place with just the occasional trip around the yard on the odd open day. I gradually built up the filler on the areas where much was required and allowed plenty of drying time in between. The sanding needs to be carefully done so as not to reduce the surface into dips. As you can see in the photo above, it turned out pretty well. In all, the two wheels took me most of the month of January before I was ready for the first primer coating of a white chalk based paint. I like using the thick white chalk paint as it helps fill in the thousands of woodworm holes and can be sanded down to level out any areas of uneveness in the old timber or the new repairs. The two wheels were then leaned safely out of the way and I started on the main chassis section.
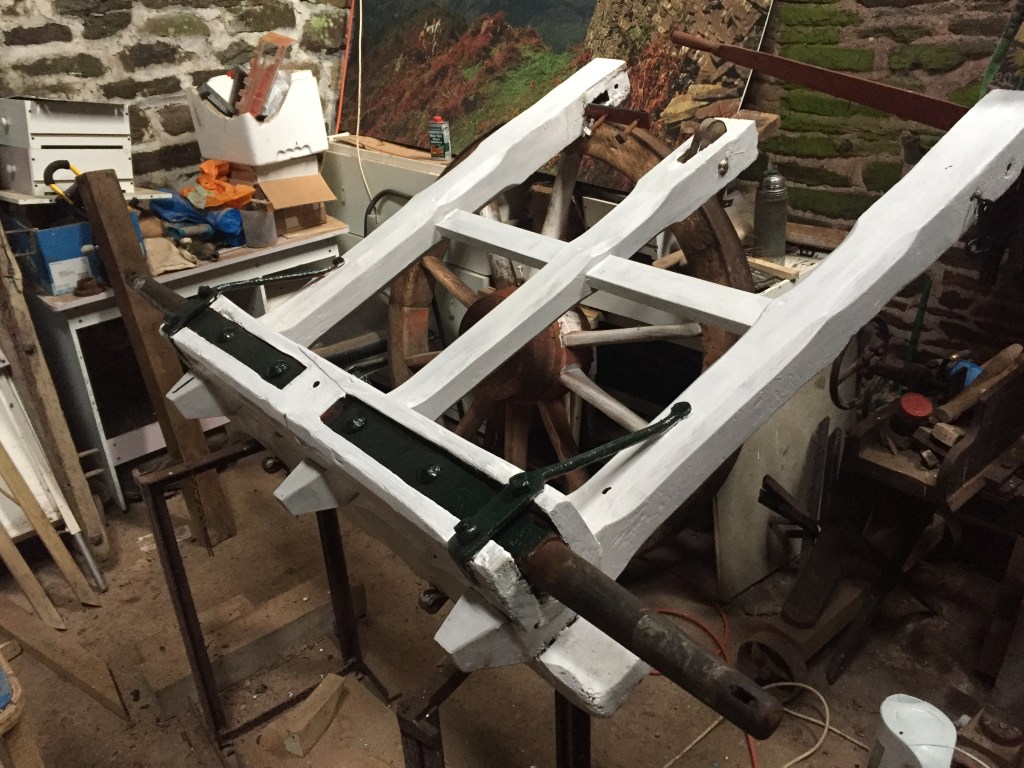
Most of the chassis or undercarriage to give it the correct name, was exceptionally sound. The only serious issue was the forward cross member which was a piece of 3″ x 3″ oak with tenons at each end which slotted into mortices in the main shaft rails – as with the gambo, the shafts and under-carriage main rails were one long piece of 4″x4″ timber, in this case it was European Larch. That particular species of semi-native conifer stands out as the most favoured and durable wood for agricultural use in the nineteenth and early twentieth centuries. Firstly, it grows straight and true and at DBH (diameter at breast height) is a manageable sized piece of timber. In Wales, especially in the upland regions west of Offa’s Dyke, the dominant oak is Sessile. commonly known as the Welsh Oak, rather than Quercus Robur, the grand classical English Oak famed in buildings and ships. The problem with the Welsh oak is its tendency, mainly a result of its growing environment, to grow in a very ‘higgly-piggly’ manner. The consequent of that is a lack of good long-length butts and limbs. It is the main reason Welsh farmsteads, houses and barns tend to be narrow as long straight oak beams were just not readily available. When it came to building carts and wagons that presented a problem especially when 15 foot lengths for shafts were needed. Hence the European Larch was an excellent substitute timber; it grew tight grained, unlike other commercial conifers especially the introduced Japanese Larch, to a good straight height and provided it was carefully managed knots could be minimised. Most importantly it hardened to an ‘oak like’ toughness and was good at repelling weather and insects. Indeed much like ‘pitch-pine’ (Scots pine) was favoured for household furniture because of its toughness and resistance to worm so too European Larch was predominant in barns and out buildings for mow-steads and railings for stock management.
That cross member had a central mortice which took the tenon from the centre undercarriage rail which in turn was slotted to take the tipping slide (clearly visible in the above photo). Now the problem with trying to get a new cross member into position was that originally the tenons on each end would have been inserted into the main sides on initial assembly. There’s no way, short of disassembling the whole structure, to get two tenons back into place. Fortunately (in one sense) the right hand shaft had broken off at that exact weak point ( the cutting of mortices always weakens small diameter timber) and so I was able to use a half tenon joint on that side. However that gave me another issue, if I tried to use a standard tenon on the other side which would just slot into the available mortice, how could I then get the mortice I had cut into the new oak cross member to take the tenon from the centre undercarriage rail !? The only answer was to cut another half-tenon joint in the left-hand shaft and cross-member end. With that done I could use my old iron and new steel plates to join the new shafts to the old undercarriage.
I then had to make the decision what to do about replacing the old shafts. One had snapped about half way along whilst the other had finally severed from the rest of the chassis at the point just where the tenon of the foreward cross member was inserted in the mortice cut into the shaft – an obvious weak spot. As I mentioned, this had been the subject of a much earlier repair incorporating iron straps which I re-used to support my new shafts.
I had a ‘new’ pair of shafts which were steamed into the classical shape and which I acquired many years ago from an old wheelwright shop and I prepared those ready for use, even down to primer painting. But I also had some lengths of ash which I had been given from the Penpont estate near Brecon by my friend Gavin Hogg, who was thinning out a part of his twenty five year old plantation. I had that sawn by a neighbour – Meirion at Coed Cadog in Llangadog (R.I.P old friend)- into 4 inch square, thirteen foot lengths with the express purpose of using that for new shafts. The old shafts were not shaped and were very much akin to the type of full length chassis-shaft as seen on a gambo. So, did I use the nice NOS (new old stock) shaped shafts which would run the length of the chassis as well as giving sufficient length to the shaft or make my own and somehow fit those to the old chassis and sawn off stubs of the old shafts ?
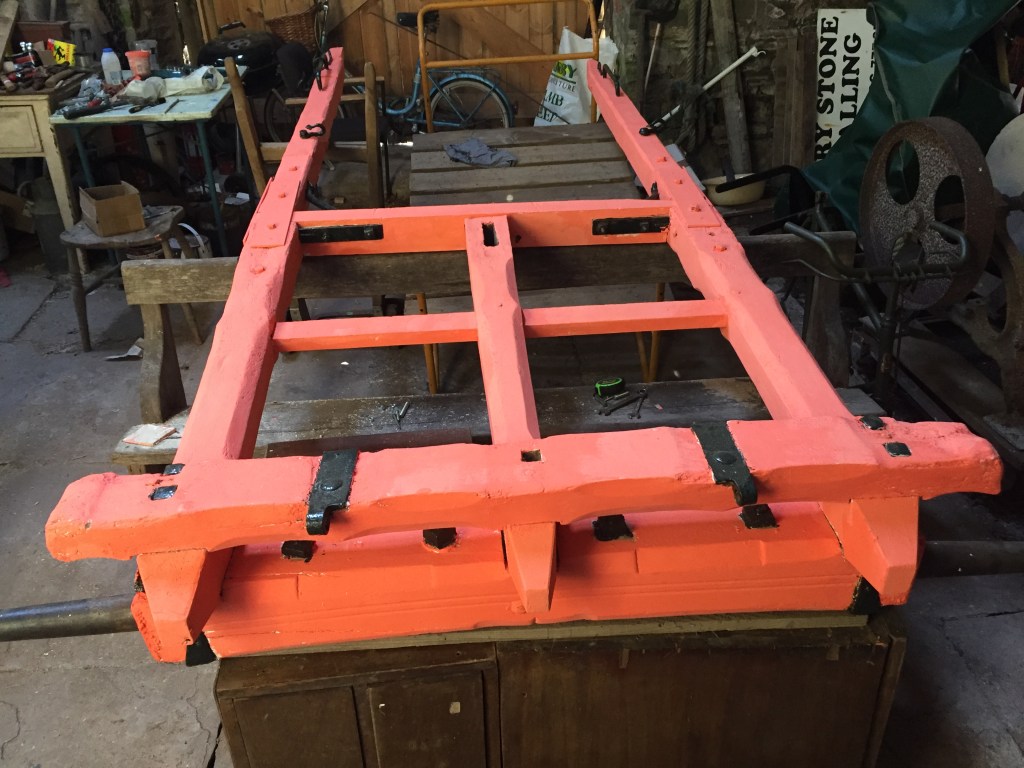
I decided – after sanding and painting the ‘new’ old stock shafts which I had – to ‘make’ my own from the ash squared poles. Using an electric sander (with apologies !) I smoothed the rough cut surfaces and then I got out the draw-knife and shaped where necessary. A little spoke-shaving was required and ultimately a satisfactory ‘replica’ set of shafts were fashioned. To fix them I had first to make a new cross member to replace the very rotten original. I used some well seasoned oak and cut a mortice in the centre into which fits the centre main beam. At each end I cut a half-tenon which fitted onto the old main chassis rails on both sides. then I simply married the squared off end surfaces together and fixed them using steel plates top and bottom. There had been iron side plates on the right hand shaft on the original and these I re-used on the underside of the new joining point as they were very strong. I also added a plate on the outside of each shaft for extra rigidity. An over-egging of my pudding perhaps and not at all craftsman like but hey-ho, it does the job and now its all painted up it hardly detracts. Even my long-time ‘adviser’ from the world of modelling said it was a perfectly acceptable and traditional method of fixing a weakened or broken shaft.
There is an inherent weak-spot in the design of the ladder-frame type cart chassis. The mortice cut into the fore cross-member weakens it, the bouncing of the shafts whilst in motion puts an inevitable strain at the point that same cross-member is tenoned into them and the constant ‘dropping’ of the shafts onto the ground once the horse is un-shafted adds to the weakening until, eventually, crack, split, snap.
Having completed the under-carriage and wheel restoration my attention turned to the tub. A whole gammit of other matters to ponder and debate.
I had it in my mind that I would be able to get away with not replacing the very rotten main bearers. I argued to myself that once I had put the new ash plank floor in they wouldn’t be seen. However once I removed all the old flooring planks (elm boards) the actual poor condition of those bearers was plain to see. It was no longer a debate; if I was going to be able to get the tipping mechanism safely working such that when the tub was tipped the whole body wouldn’t come apart, then new bearers had to be made and installed.
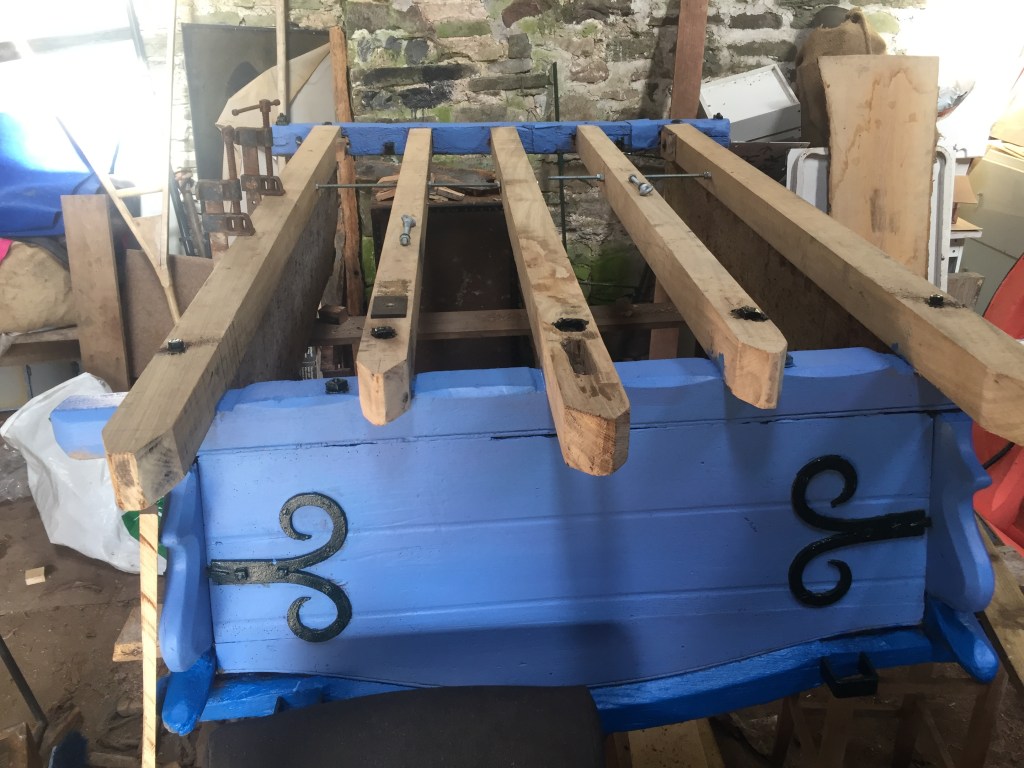
Fortunately I have an excellent ‘man-of-wood’ just a couple of miles away. Simon at Dinefwr Gates has been in business as long as I have been walling. We both took the opportunity afforded by an early Farm Environmental scheme called Tir Cymen back at the beginning of the 1990s. His speciality is all things timber, be it gates, stiles, picnic benches or, for me, new oak bearers. He cut and planed me five new bearers of semi-green oak and I got to work on the various tenons and holes. One mortice had to be cut in the central bearer to accommodate the tipping stay which runs from the fore-end cross member of the chassis up through the central bearer and has a number of holes into which can be placed an iron pin to hold the tub in a tipped position, at various angles of steepness, or locked in the ‘at-rest’ pose.
The bed was planked using some one inch thick ash boards of various random widths – they had been sawn from trees I had felled many years ago, before the dreaded die-back had reached Wales and ring dating put them at around 140 years old – and left unpainted. The tipping mechanism is a simple iron bar that slides through the main bearers, passes through two iron rings that are bolted through the second and fourth bearers and through a similar pair of eye bolts fixed to the rear chassis cross member. The design and balance is no accident, it means that when fully tipped the tub can be rested on the ground and even when loaded the point of balance allows easy tilting.
The last piece of the jig-saw was the tail-gate. I had kept aside a good sized ash plank which I had decided would make a suitable replacement tail-gate. Indeed I had drawn a plan of the frame onto which that plank and the associated iron-work fixings could be attached and had even begun to work out the spacing for the sign writing. Then, by sheer accident, I had to move another cart tub which was sitting on a pallet right in front of a piece of machinery that needed to be moved. As I un-covered that tub (itself retrieved from an old mid-Wales farm along with next winter’s tumbril restoration !) I discovered, somewhat to my astonishment, three old tail gates from tumbrils. Over the years I have had several old carts most of which were too far gone for any restoration attempts. I assumed those tail-gates were from those. However, mainly by the old colour, one looked distinctly like it may have been from the Aberduhonnu cart. I had no recollection of whether or not I had acquired its tail gate when I got the cart, it was a long time ago ! It turned out it was indeed the one and with some fettling it would once again serve the purpose for which it had been made well over a hundred years prior.
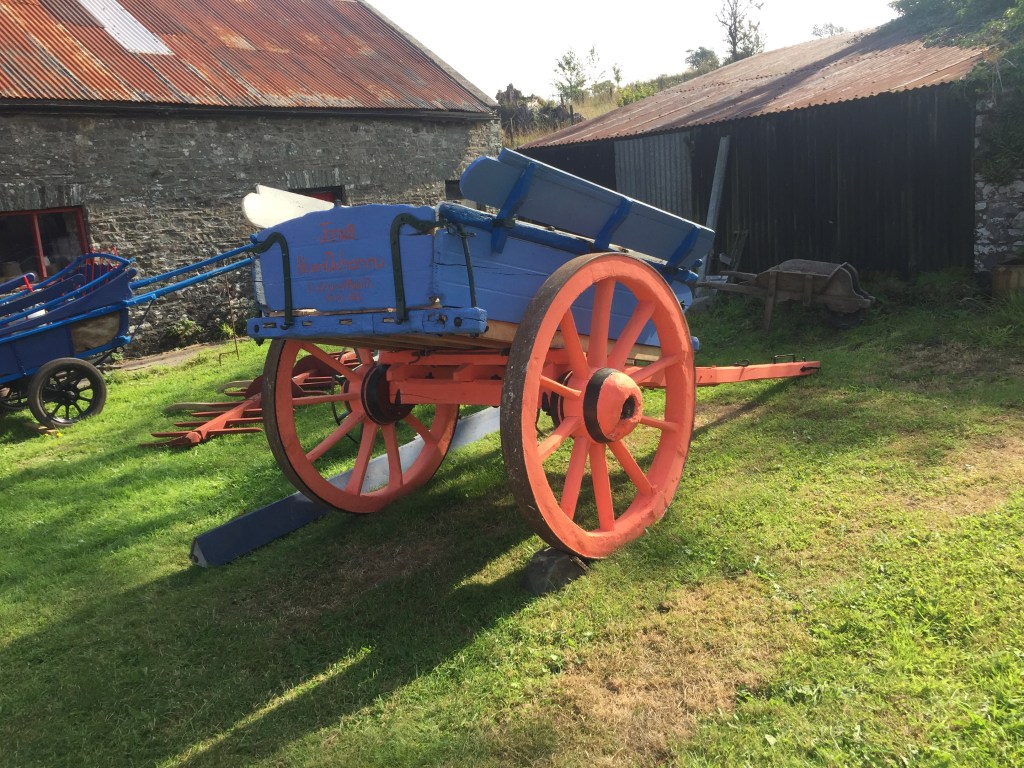
I made a pair of new side extension boards as the pair that came with the old girl were well rotten and slotted them onto the brackets on the side of the tub. The last job was to put the name of its owner and home from those long-ago days.
The Jones’ of Aberduhonnu were first farming at Ysciog in Abernant, a small hamlet a few miles down the Wye from Aberduhonnu. I had found the remnants of that name on the left front side of the tub. There was no old signage on the tail-gate but I decided I would have a go at my first sign writing and put both the farm names back on the cart. I painted ‘Jones Ysciog Abernant’ in a size that matched the original (about 10″ long and three lines 2″ high). The tail gate was to have ‘Jones’, Aberduhonnu, Llanfair ym Muallt’ (Welsh name for Builth Wells) Brecs. (Brecknockshire in old money). I had never done any sign writing and certainly did not have the correct long bristled brush to do it with. But I had done art to A level in school and had done a lot of small detailed painting over the years so I decided to have a go. I measured out the the space I had on the tail-gate and cut out a large piece of paper to match. I then worked out how many letters per line and through mathematical calculation how many squares for each letter. I did a practise run of each letter in the relevant square until I was happy that it looked presentable. I then transferred that to the tail-gate, which was flat on a trestle a set to work. I used a subtle chalk paint and did one line a day. I quickly discovered that some letters looked lost in a square, for instance the ‘i’ was very lonely and broke the spacing too much. However, I persevered and was reasonably satisfied with the end result. It’s probably how it would have looked back in the day providing it had been done by the farm worker not the village sign writer !
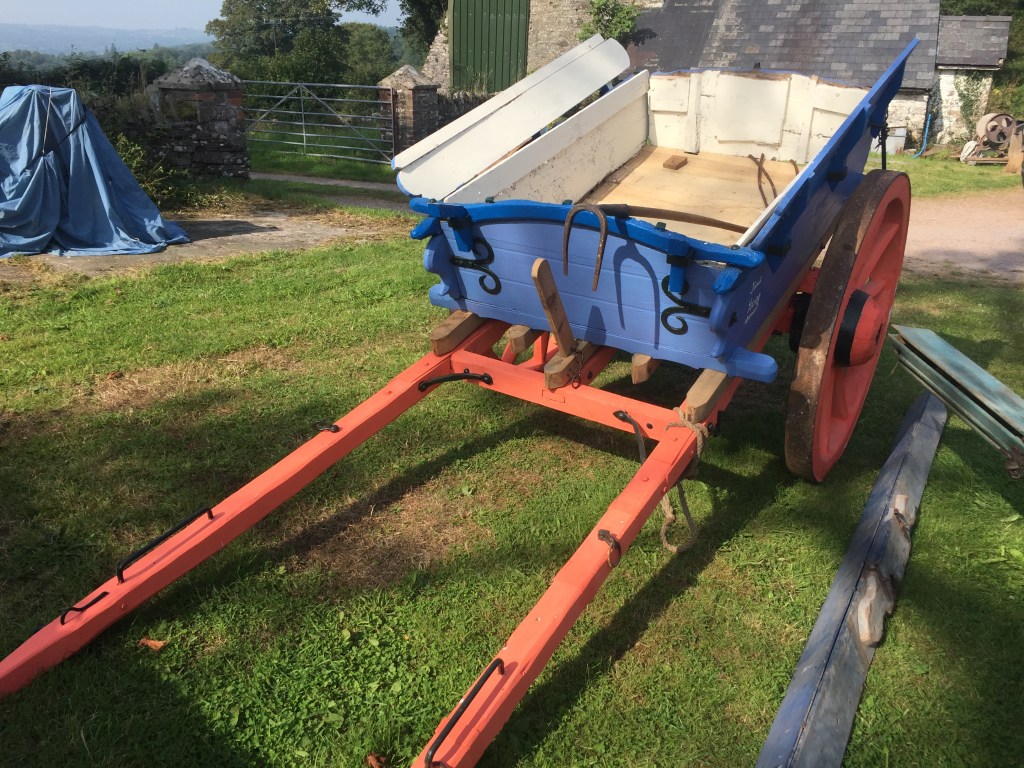
The only thing I’m slightly disappointed with is the colour. As I have mentioned previously, paint is an expensive item these days so where possible I us what I have. I had been given some expensive white chalk based (lime) paint, quite a substantial amount, by an old friend (indeed the friend whose father had been the source of the lead primer I had used on my gambo) and it was with that I painted the undercoats of the chassis, shafts and the inside of the tub. I bought some colourant to mix with it to try to get a traditional ‘salmon pink’ which most carts were finished in, back in the day. I didn’t quite get it correct and whilst I’m happy enough with the Wedgewood blue, another chalk based paint, the salmon is a little to pinky and bright. hopefully it will tone down as it ages. The iron work I painted in a deep green gloss over a red-oxide primer, again as that’s what I had and I don’t care for black on metalwork.
Maybe I should have logged the hours, maybe the costs, I mean each wheel took a tub and more of filler at £8 a tub and as for paint…. But this is done as a pleasurable activity and more importantly to respect and honour the folk who made the cart a century and more ago, to remember all the hours of hard graft that farmers and labourers put in while using it, even the tons and tons of manure it must have hauled from the midden to the fields. Mostly it’s to honour a promise I made to Jeff Jones at Aberduhonnu that I would look after it in memory of his dear sister and last of the Aberduhonnu farming clan, Maude.

very nice work. Some years ago I saw a lovely old tipping muck cart about to be burnt just outside Wooler in Northumberland. I gave him a fiver and took it home.
It has been outside since. I used it for some years but eventually the “Shafts ” that had been cut off so it could be pulled by a tractor rotted
The ironwork that is beneath is a real eye opener when you release the handle and the whole cart body tips into the vertical! Unbelievable !!The ends of the chases had been clothed in metal skids so that it could be drawn forward till all the muck had come out!!
I worked on a farm in the 60s cleaning out hemmers and the old guy setting the pace said ,”come on !big lumps and often!!! such philosophy
LikeLike